If when you hear the word “craft” you automatically have visions of kindergarten art projects or old ladies knitting, prepare to be blown away. In 2019, crafting has taken on a whole new meaning, with more of a bent toward cool DIY undertakings. Think midcentury-inspired home decor, all-natural beauty products, and even experimental recipes. Plus, DIYing can be a perfect excuse to get your BFFs together for a day of hands-on fun, golden Instagram shots, and a way to knock out all of your holiday gifting needs. Keep reading to get the inside scoop on some of our favorite DIY projects to take you through the holidays and into the new year.

All at once subtle and eye-catching, marbled candles are a lovely gift for everyone from your mom to your coworker. They’re totally customizable with different sizes and colors — go for a pastel minty green for someone who loves a neutral color palette or a vibrant violet for a friend with bolder tastes. Here’s what you’ll need:
- A white pillar candle
- A small bucket and trash bags to fit
- 2-3 enamel paint colors (these will stain!) — if you want a lighter pastel, mix your colored paint with quite a bit of white to tone down the vibrance
- A drop cloth and paper towels
- Something to stir with (a popsicle stick, toothpick, or wooden dowel will work)
- Gloves
If you care about staining your bucket, line it with a small trash bag. Fill it with room-temperature water, add a few drops of your first paint color on the surface, and follow with your second (and maybe even third!) color — drop close to the surface so the paint doesn’t sink. Use your paint stirrer to move them around just on the surface. Hold the candle by the wick, submerge it fully in the water, and make a few circular swirls. Before you bring up the candle, use paper towels to dab the surface of the water and remove all remaining paint (so it won’t add a second marble as you take the candle out of the water). Give the candle a little shake when you take it out to remove any excess water. Let it dry overnight, and voila! A gorgeous new piece of home decor.

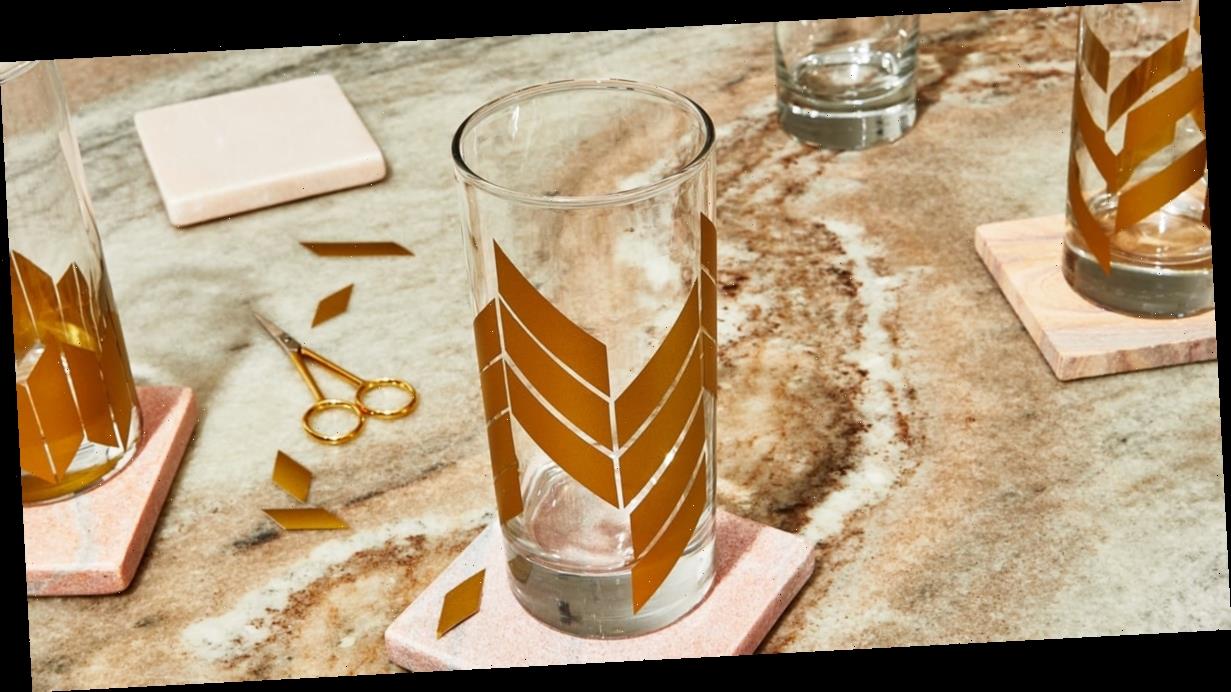
Take plain glasses and turn them into a stylized set, complete with retro designs that will level up any tablescape. The best part? This project takes less than an hour, So make a gift set and one for yourself while you’re at it! Here’s what you’ll need:
- A set of plain glass tumblers (or any type of glasswear you like!)
- An X-Acto knife
- A ruler
- A roll of glossy gold vinyl (or any other color)
- Tweezers
Start by grabbing a roll of 651 vinyl — it’s meant for outdoor use, meaning it is washable and won’t unstick when you clean your glasses. Use your ruler and X-Acto knife to cut strips of equal width from your vinyl roll, then cut the top and bottom at an angle. Keep your cuts rather light so you can use your tweezers to pull the vinyl from the backing. Then gently create your designs on each tumbler. Easy peasy.

Sure, plants are a great gift no matter what, but you can really make an impression by creating a personalized terrarium full of succulents. Beyond the basic plants and pebbles, small crystals, live moss, and little cacti are also fun additions and allow you to tailor the little garden to your giftee’s personal style. Here’s what you’ll need:
- Glass terrarium vessel
- Decorative sand and/or moss
- Pebbles
- Potting soil
- Assorted succulents and air plants
Cover the bottom of your vessel with about an inch of pebbles for drainage, then about two inches of potting soil. Nestle your plants with roots into the soil at different heights and pat around them. Then add a layer of decorative sand, more pebbles, and air plants — a spoon with a long handle can be helpful here. Mist the plants with a fine spritz of water about once a week to keep them healthy and thriving.

It’s a proven fact: everyone loves a bath bomb. Make several batches with different colors and essential oils and give them to everyone on your list. Here’s what you’ll need:
- Bath bomb mold
- 1 cup baking soda
- 1/2 cup citric acid
- 1/2 cup Epsom salts
- 1/2 cup cornstarch
- 3/4 tsp. water
- 2 tsp. essential oil (eucalyptus, lavender, and rosemary are nice for the bath)
- 1 tsp. oil like sweet almond or jojoba
- A few drops of food coloring
Mix everything other than the citric acid in a bowl. Add all the liquid ingredients to a jar with a lid and shake vigorously. Pour the liquid into the dry ingredients and mix using your hands, then add citric acid (get ready for a fizz!). The mixture should feel like wet sand. Pack the mix super tightly into your molds, then remove from the mold and place them on wax paper to dry overnight. Let them dry for another day or two before wrapping.

Yes, a recipe can be a DIY project! We love the idea of testing different flavor combinations and gifting your friends and family with a personalized recipe basket. Add all the ingredients to a picnic basket and make a date to cook together! This One Pot Spaghetti Carbonara has tons of different ingredient substitutions you can try, like swapping the bacon for mushrooms for a vegetarian friend. Here’s what you’ll need:
- 6-quart sauce pot
- 4 slices bacon, chopped
- 1 large shallot, chopped (about 1/2 cup)
- 1 can Campbell’s® Condensed Cream of Chicken Soup or Campbell’s® Condensed 98% Fat Free Cream of Chicken Soup
- 3 1/2 cups Swanson® Natural Goodness® Chicken Broth
- 1/2 cup grated Parmesan cheese
- 8 ounces uncooked spaghetti
- 1 cup frozen peas, thawed
Cook the bacon and shallot in the pot over medium-high heat for five minutes or until the bacon is browned, stirring occasionally. Stir in the soup, broth, and cheese and heat to a boil, then add the spaghetti. Reduce the heat to medium-low and cook for 10 minutes or until the spaghetti is tender and the soup mixture has thickened, stirring occasionally. Stir in the peas and sprinkle with the additional cheese just before serving.
Source: Read Full Article